IR to WiFi air calculator fan conversion with Home Assistant and ESPHome
I recently bought an air calculator fan which I was expecting to automate using an existing IR blaster, but I was disappointed with its IR receiver range and angles. The signals from my WiFi IR blaster, which works perfectly with other devices in the same room, weren't reaching the fan.
Determined to fix this, I opened the fan and discovered a spacious base and a modular DC power supply (25V) powering the efficient DC motor. This gave me an idea: why not build an IR blaster right inside the fan base?
Parts List
To make this happen, I used the following components:
DC-DC step down buck converter (5-30V to 5V)
USB TTL adapter (for initial flashing)
Initial Flashing (Capture Mode)
Connect the ESP-01M IR module to a PC using the USB TTL adapter. (Note: You might need to run Windows Update to install the necessary drivers.)
Open ESPHome in your Home Assistant instance.
Initialize the device, adding the following YAML code: remote_receiver: pin: number: GPIO14 inverted: true dump: all
With the log window open, proceed to the next steps.
Capturing and Setting IR Codes
After initialization, press each button on the fan's IR remote and carefully note the "NEC" address and command for each one.
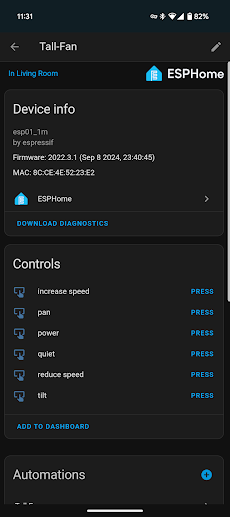
Add the codes as buttons in the device's YAML file:
button:
- platform: template
name: "power"
on_press:
- remote_transmitter.transmit_nec:
address: 0xDE80
command: 0xFF00
- platform: template
name: "reduce speed"
on_press:
- remote_transmitter.transmit_nec:
address: 0xDE80
command: 0xEB14
- platform: template
name: "increase speed"
on_press:
- remote_transmitter.transmit_nec:
address: 0xDE80
command: 0xE916
- platform: template
name: "pan"
on_press:
- remote_transmitter.transmit_nec:
address: 0xDE80
command: 0xF50A
- platform: template
name: "tilt"
on_press:
- remote_transmitter.transmit_nec:
address: 0xDE80
command: 0xF10E
- platform: template
name: "quiet"
on_press:
- remote_transmitter.transmit_nec:
address: 0xDE80
command: 0xEE11
This should result in the buttons appearing in Home Assistant.
Testing the Setup
Before making any irreversible changes to the fan, I tested the IR transmitter. I connected it to a USB battery using the USB TTL adapter and placed it on top of the fan. To my satisfaction, all buttons worked flawlessly!
Final Assembly
Confident in the test success, I moved on to the final assembly. I was a bit concerned about module placement, but the internal space of the fan base seemed highly IR-reflective, suggesting that any suitable spot would work.
Use the T-tap to connect to the 25V DC power cable.
Connect the DC buck converter inline.
Heat-shrink the buck converter, as a precaution.
Attach the IR transmitter
Secure the buck converter and IR transmitter to the base using double-sided polyurethane tape
Finally, reassemble the fan.
Finishing Touches
In Home Assistant, I added a UI button to control the fan power and added toggle helper to display the fan's state. However, without a power sensor, there's a chance the states could get out of sync.
As a final touch of irony, I reprogrammed an Ikea Tradfri 5-button remote to control the fan, just so my wife will wonder why I spent so much time "making a remote" when the fan comes with one.


Comments
Post a Comment