Posts

How to Reassign the Copilot Key to Launch Gemini

Image
It's 1994 all over again, but instead of the Windows key, Microsoft is pushing the Copilot key onto our keyboards, regardless of our AI preferences. While Microsoft believes Copilot enhances Windows PCs with features like " Recall ", many, myself included, prefer a cleaner OS experience, rendering the Copilot button unnecessary. Microsoft's limited customization options for the button is a frustration, further hindered for those who disable Copilot. Thankfully, reassigning the button is a simple workaround. I'll demonstrate how to reassign it to Google Gemini using AutoHotkey or MS PowerToys. 1. Install the Gemini app Navigate to gemini.google.com in a Chrome-based browser Click the three vertical dots (kebab menu) and select Cast, save, and share . Choose Install page as app... and click Install in the popup that appears. 2. Find the app target (app ID) Search for "Gemini" in the Windows Start menu. Right-click the Gemini shortcut and select Open file...

IR to WiFi air calculator fan conversion with Home Assistant and ESPHome

Image
I recently bought an air calculator fan which I was expecting to automate using an existing IR blaster, but I was disappointed with its IR receiver range and angles. The signals from my WiFi IR blaster, which works perfectly with other devices in the same room, weren't reaching the fan. Determined to fix this, I opened the fan and discovered a spacious base and a modular DC power supply (25V) powering the efficient DC motor. This gave me an idea: why not build an IR blaster right inside the fan base? Parts List To make this happen, I used the following components: DC-DC step down buck converter (5-30V to 5V) 2-wire T-type wire tap ESP8285 ESP-01M IR transmitter/receiver USB TTL adapter (for initial flashing) Total cost: ~$12 Initial Flashing (Capture Mode) Connect the ESP-01M IR module to a PC using the USB TTL adapter. (Note: You might need to run Windows Update to install the necessary drivers.) Open ESPHome in your Home Assistant instance. Initialize the device, adding the fo...

Windows error "SmartScreen can't be reached right now" on IPv6-only network

Image
If you're reading this, chances are you've spent hours scouring the internet for solutions to a frustrating tech problem. You've probably tried the same "fixes" repeated on every blog and forum:  Toggle SmartScreen on/off Check your Internet Check your proxy settings Create a new Windows user  And yet, nothing seems to work. In my case, it was resolved by switching from my IPv6-only network to IPv4 . It seems Microsoft's service is currently running on an IPv4 endpoint.

KingNovyPC M6 N100 Alder Lake-N Slim Mini PC Review

Image
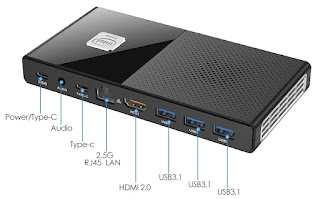
I recently purchased a KingNovyPC M6 N100 mini PC from  Aliexpress  to replace a laptop I carry between home and work. I chose the 16GB model with no storage for 27,651 JPY (~$183 US). I think this is a good deal even given the drawbacks below. Let me start with the bad first. Poor thermals The cooling is woefully inadequate for the N100 CPU. The CPU temperature frequently exceeded 90°C under moderately intensive activities, such as installing several Windows updates in parallel. The thermal throttling and lag became noticeable during these times. The fan speed shows "n/a" because there is no yellow fan sensor wire. Replacing the heatsink compound with high-quality silver paste* had negligible impact but removing the top cover dropped temps by ~10°C. That's still high but out of the danger zone. I can think of many ways KingNovy (or the ODM) could have improved this thermal design, such as using a metal case to increase dissipation, but that would have added to the weight...

Flash Wio Node to ESPHome or Tasmota

Image
Wio Nodes are tiny wireless controller boards built by Seeed Studio as part of the Grove system which supports  hundreds of hardware widgets and sensors . The nodes were designed to be configured with the Wio app and linked through a Wio server. It's unclear if the Seeed Studio Wio service is just down temporarily or entirely deprecated, but the Wio server  displayed an error while trying to setup some old Wio Nodes  I had sitting in a box. I assumed these nifty little boards were rendered useless by service deprecation, and none of my favorite open source firmwares mentioned support for the "ESP-WROOM-02" chip on the board. It wasn't until a few days ago when I learned that "ESP-WROOM-02" is not the chip but an assembly, which uses the popular ESP8266 chip at its core. Now the question was not if but how can I flash it? Seeed Studio's  Github repo  didn't include flashing instructions but did include the board schematics which held the key to flas...

Raspberry Pi-based Home Assistant Control Panel

Image
This is my take on a Home Assistant control panel platform. It's based on this guide to creating a Raspberry Pi minimal browser kiosk but with wake-on-motion and some tweaks to improve the experience. Background info, why I chose this over the other options, and plans for future expansion are at the bottom, for anyone interested. My plan is to install one in each room with room-specific widgets. Hardware RaspberryPi 3 B 8GB or larger high quality microSD Official  Rpi 7" touchscreen Official  Rpi camera v2 Smartipi touch2  case with camera mount USB keyboard for initial HA login Assemble the parts according to the included instructions but keep the microSD out for now for imaging. Raspbian lite setup Image Raspbian Lite to the SD using the imaging tool or other method. Create an empty file on the SD boot directory named ssh to enable SSH on boot. Create a file in the SD boot directory named wpa_supplicant.conf with the following content, replacing the variables with ...